Camping Wood Stoves
Camping wood burning stoves can be very lightweight, inexpensive to operate and easy to make, see DIY instructions.
More than half of the global population cooks and heats using solid fuel, much of it burning up in pits that have seen no betterment since mankind first learnt how to make fire.
Undoubtedly this is a growing and severe issue.
Ineffective cooking fires cause a significant waste of fuel; produce vast quantities of carbon dioxide, and greenhouse gases releasing them into the atmosphere.
Fires often lead to the injury of persons who use them to cook their meals or as a means to stay warm.
Camping wood stoves which rely on the charring of wood or other natural solid fuels on the other hand are known for releasing natural gases that burn safely in the atmosphere.
If you’ve ever had the pleasure of closely watching a campfire, you may have noticed little jets of smoke bursting from the wood ahead of the flame. Moreover if the conditions are just, you'll see a smoke jet upon catching a fire briefly and turning into a small fountain of flame.
There are several types of camping wood stoves. Below you'll find two of most commonly used camping stoves to boost the efficiency of the cooking fire.

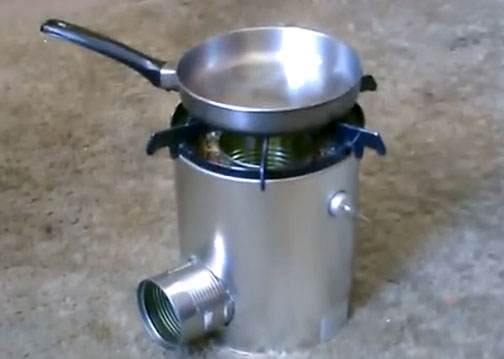
Believe or not - it is a home-made camping stove! :-)
Wood and Solid Fuel Stoves
Although the average wood-burning stove is considered to be somewhat large, they are often lightweight since the person camping doesn't need to bring along any fuel. The typical wood stove is fundamentally a cylindrical chimney with a few vents in the bottom to facilitate an adequate airflow. Do It Yourself campers are often known to build some of the best camping wood stoves out of nothing but a coffee can and some tin snips.
Below is a DIY design showing you how to make your own lightweight and inexpensive wood-burning stove, which can be used for backpacking, bush cooking or even bike touring.
This camping wood stove is easily built from a list of everyday parts commonly available parts laying around the home or purchased at your local hardware store and include: quart paint can, smaller tin can, shorter tin can, safety-style can opener and an Irwin Unibit #1.
First see and listen, then continue reading step by step....
How to Make Lightweight and Inexpensive Wood-Burning Stove
Parts You'll need:
• 1-quart paint can, with lid.
• One 19 ounce Progresso soup can. A 20 ounce fruit can will also work as well, however the Progresso cans are a bit shorter, and ideal for making the stove.
• A Large, short can such as one used in the packaging of cat food and canned meats. Aluminum cans are not recommended as they tend to melt when exposed to the heat.
Tools You Will Need:
• Drill.
• Tin Snips.
• Irwin Unibit #1.
• Safety Can Opener .
• Sharpie marker, Electrical Tape and a pair of Scissors for marking the position of the holes.
• Fabric Measurement Tape.
Drill two rows of 1/4" holes in the bottom side walls of the can.
Measure top holes of the inner can
• The perimeter of your can is in the area of 10 1/2". Mark 10 spots an inch apart, leaving one area with a slight opening in-between the holes.
Drill the top holes
• Drill holes into your dots, all the way down to the bottom of the unibit.
Measure holes in the outer wall
• The outer can is about 13 1/4" in circumference. Measure 10 holes, an inch apart. leaving a gap between them.
Drill holes in the outer can
• Make 1/2" holes in the can on your marks.
Remove the bottom of the outer can
• Use your safety cutter to remove the lid.
Press fit cans together
• Taking your soup can, press the top rim into the inside-top rim of the quart paint can. Crimp the seal by striking the lid back on as far as it will go using a rubber mallet.
Drill out windscreen
• Make a diamond-pattern of 3/8" holes,.
• Leave some room to cut a feed slot out.
Cut and crimp the feet slot
• Using the tin snips, cut out a section of the can to create an opening to feed sticks into the fire while a pot is in place. Crimp the edges with your pliers to modify the cut and reduce the chances of tearing a finger.
Remove the bottom of the can with your safety opener, and throw away.
Cut through the top, leaving a encircle that can be stored between the walls or hidden on the top ring of the can.
That's it you've now made your very own camping wooden stove.
Note: A camping wood-burning stove produces a certain amount of carbon monoxide which is hazardous to your health. Do not use a camp wood-burning stove indoors. Always use it in an outdoor environment and never on a wooden table or park bench as the heat generated from the stove will likely mark the bench. Instead always set it on the dirt in an open and well ventilated area.
Commercial Camping Wood Stoves
Having gone through this DIY project you may still like to purchase a professionally made camping wood stove for your camping needs. Below are selected camping wooden stoves made by some of the popular brand names:
- The TMS Stove-2346 Portable Military Camping Tent Steel Wood Stove.
- The Camping Outdoor Cooking Hiking Supplies Equipment Gear Solo Wood Burning Stove
- The EmberLit Stainless Steel Camp Survival Stove-Wood Burning
Camping wood stoves today still remain one of the most ingenious environmentally friendly and methods of cooking by transforming solid wood into a hot gas, then burning it by inserting pre-heated air at the closest point on top of the stove.
.


